Guide&SYSTEM
You already possess the skills to control AI, not just trust it.
Now, experience a new future with Z-BUDDY.
Add paragraph text. Click “Edit Text” to update the font, size and more. To change and reuse text themes, go to Site Styles.

How to Use Z-BUDDY
Step 1 — Set the Command Conditions
Choose the role, mode, topic, language, and constraints before writing your prompt.
Step 2 — Write Your Prompt
Enter your actual command, question, or request in the main text area.
Step 3 — Choose an AI Agent
Select which AI agent will receive the prompt.
Step 4 — Execute
Send the prepared prompt to the selected AI agent.
Add a Title
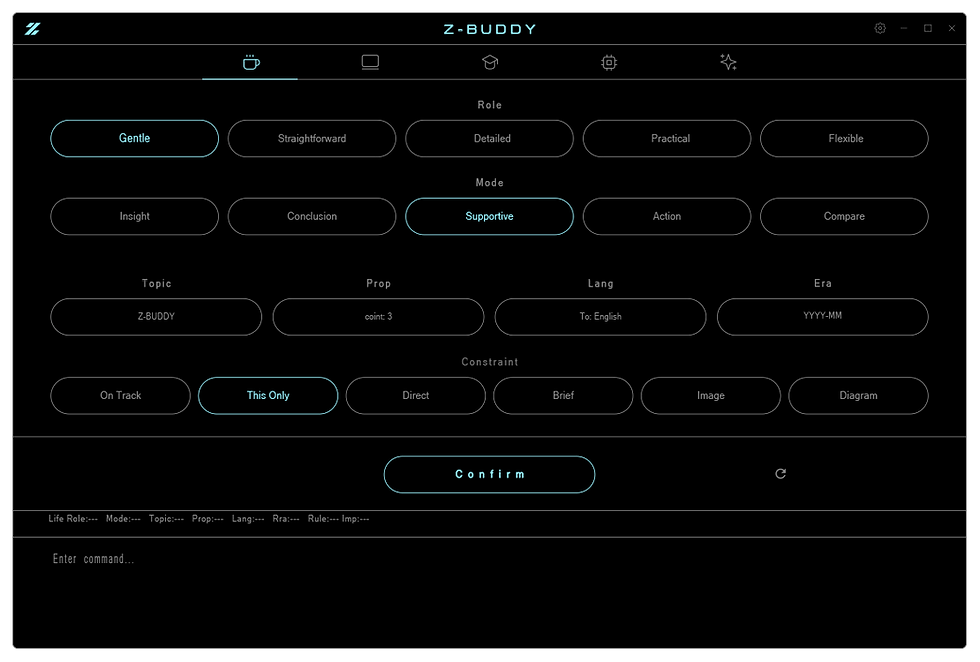
Layer 1 / Command Setup
Layer 1 is the first control area where the user defines how the AI should respond before sending a prompt.
In this area, the user can select the working environment, role, response mode, topic, proposal count, language, time period, and additional constraints. These settings are not the main message itself. They work as response conditions added by Z-BUDDY to guide the AI’s behavior.
First, the user selects a category such as Life, Work, Learn, Develop, or Create. Each category changes the available role and response mode options. This allows the user to quickly switch the AI’s behavior depending on the purpose of the task.
Next, the user chooses a role. The role defines the attitude or perspective the AI should take, such as being logical, practical, supportive, strict, creative, or educational. This helps the AI answer with a more consistent tone.
The response mode defines how the AI should structure its answer. For example, the user can guide the AI to explain step by step, focus on corrections, summarize briefly, provide examples, prioritize code, or organize ideas more strategically.
The user can also enter additional conditions such as the topic, number of proposals, target language, or time period. These fields help narrow the response and reduce ambiguity.
The constraint buttons add stricter rules to the response. For example, they can keep the answer on track, limit the response to the current question, request a direct answer, ask for a brief summary, or indicate that an image or diagram should be considered.
After selecting the necessary options, the user presses the Confirm button. Once confirmed, the selected conditions are locked into the status area and become the instruction framework for the next command.
This process allows the user to shape the AI’s response before typing or sending the main prompt. Instead of repeatedly writing long instructions by hand, Z-BUDDY lets the user prepare the response style through simple controls.
Layer 2 / Text Input & Prompt Execution
Layer 2 is the main text input area where the user writes the actual command, question, instruction, or prompt to be sent to an AI agent.
While Layer 1 defines the response conditions, Layer 2 is where the user enters the main content. The text written here becomes the core message that Z-BUDDY sends to the AI.
The large input field is designed for flexible prompt writing. The user can enter a short question, a detailed instruction, a draft text, a translation request, a code request, an analysis request, or any other command. This area supports longer text, so it can be used not only for simple chat, but also for structured work, writing, research, development, and creative tasks.
Before execution, the content in Layer 2 is combined with the selected conditions from Layer 1. This means the AI receives both the user’s main prompt and the response framework selected through the control buttons. As a result, the AI can respond according to the chosen role, mode, topic, language, era, and constraints.
The text input area is also connected to the status display. The selected command conditions remain visible above the input field, allowing the user to confirm the current response setup before sending. This helps prevent accidental prompts, wrong modes, or unclear instructions.
The third row allows the user to switch the active AI agent before sending the prompt. When multiple agents are available, the user can choose which agent should receive the command. This makes it possible to prepare one prompt in Layer 2 and then send it to the most suitable AI agent for the task.
When the user is ready, the prompt can be executed and sent to the currently active AI agent. The execution button sends the prepared text into the selected browser/agent area.
Layer 2 is therefore the central command writing space of Z-BUDDY. It works together with Layer 1 and the third row: Layer 1 prepares how the AI should respond, Layer 2 provides what the AI should respond to, and the third row selects which AI agent will receive the command.
